HMR은 개발과정에서 full reload 없이 파일 변경에 따른 모듈의 변화, 추가, 삭제를 감지하고 즉시 반영해 개발 속도를 높이는 기능이다. 보통은 프레임워크나 라이브러리에서 제공하는 기능으로 React에서는 React-refresh 패키지를 이용해 제공하고 있고, Next에서는 Fast Refresh로 제공하고 있다. 최근 Next로 서비스를 개발하면서 발생한 Fast Refresh 이슈를 해결하고 프론트엔드 챕터 내 해결방안을 공유하게 되었다. 그과정에서 평소에 깊이 있게 이해하지 않았던 내용들이 있어 정리해보고자 한다.
HMR (Hot Module Replacement)
HMR은 webpack에서 잘 설명되어있어 webpack 공식 문서를 참고해 정리해보려한다. HMR은 webpack의 설명을 보면 어플리케이션이 동작하는 동안 full reload 없이 모듈의 변화, 추가, 삭제를 감지하고 이를 적용해 개발 속도를 높이는 기능으로 소개하고 있다.
full reload를 하게 되면서 자바스크립트를 새롭게 받아와 실행하기 때문에 작업 과정에서 만들어진 기존 상태와 데이터 등을 모두 잃어버리게 되기 되는데 이를 방지하고, 필요한 모듈만 업데이트해 개발시간을 단축할 수 있다.
HMR 동작방식
HMR이 동작하는 과정을 webpack 공식 문서에서는 각 요소별로 역할을 설명하고 있다.
Application
Application은 브라우저에서 실행되는 JavaScript 코드를 의미하며, HMR의 클라이언트 부분을 담당한다.
- HMR 런타임을 통해 업데이트 확인 요청
- 업데이트된 모듈을 비동기적으로 다운로드
- 런타임에 업데이트 적용
- 애플리케이션의 상태를 유지하면서 새로운 코드를 적용
Compiler
컴파일러는 코드가 변경됨에 따라 새로운 변경된 코드를 만들어낸다. 이때 변경된 파일에는 새롭게 컴파일된 해시가 담겨있는 manifest와 chunk가 포함되어있다.
Module
코드 변경이 일어날 모듈에는 변경되었다는 것을 알려줄 수 있도록 HMR 코드가 작성될 수 있다. 모든 파일에 작성될 필요는 없으며, 업데이트는 버블링 되어 적용된다. webpack에서는 module.hot 객체를 통해 제공된다.
Runtime
파일 변경이 일어나면 각 파일별로 실행할 콜백함수를 지정할 수 있다. webpack에서 이때 두가지 API가 제공되는데 check, apply가 있다.
- check: 변경된 모듈이 존재하는지 확인
- apply: 변경된 모듈을 적용
공식 문서의 내용을 정리해보면 HMR 기능을 위해서 총 5가지 과정이 필요하다.
- 개발 서버
- 파일 변경 정보를 주고 받을 웹소켓 서버와 클라이언트
- 파일 변경 감지에 따른 이벤트 수신/발신
- 변경된 모듈 파일에 대한 재컴파일 및 파일 전송
- 변경된 모듈을 받아 애플리케이션에서 변경사항 적용
webpack-dev-server을 이용해 HMR 구현해보기
이제 webpack을 이용해서 HMR기능을 간단히 구현해보자. 이또한 가이드 문서에 자세히 나와있어 해당 예시로 구현해보았다.
webpack-dev-server는 webpack에서 제공하는 개발 서버로 버전 4.0.0부터 default로 HMR 기능을 제공한다.
npm install --save-dev webpack-dev-server// package.json
"scripts": {
"start": "webpack serve --open"
}// webpack.config.js
module.exports = {
// ...
devServer: {
hot: true, // default: true
},
}
여기에 css와 같은 스타일의 변화는 style-loader를 추가하면 된다. style-loader 내부에는 module.hot으로 변경된 스타일을 적용할 수 있게 구현되어 있다.
// webpack.config.js
module.exports = {
  // ...
  module: {
    rules: [
      {
        test: /\.css$/,
        use: ['style-loader', 'css-loader'],
      },
    ],
  },
생각보다 너무 간단하게 구현되었는데 webpack-dev-server 패키지와 webpack 자체적으로 많은 로직을 캡슐화하고 처리하기 때문이다.
그러면 조금 더 내부에 어떻게 구현되어있는지 알아보자. 아래 설명할 때는 위 5가지 기능에 좀 더 초점을 맞춰서 순서대로 분석해보려한다.
Webpack과 webpack-dev-server 파헤쳐보기
먼저 webpack-dev-server 패키지 정보를 살펴보자.
// https://github.com/webpack/webpack-dev-server/blob/master/package.json
{
  "dependencies": {
    "ansi-html-community": "^0.0.8",
    "bonjour-service": "^1.2.1",
    "chokidar": "^3.6.0",
    "colorette": "^2.0.10",
    "compression": "^1.7.4",
    "connect-history-api-fallback": "^2.0.0",
    "express": "^4.21.2",
    "graceful-fs": "^4.2.6",
    "http-proxy-middleware": "^2.0.7",
    "ipaddr.js": "^2.1.0",
    "launch-editor": "^2.6.1",
    "open": "^10.0.3",
    "p-retry": "^6.2.0",
    "schema-utils": "^4.2.0",
    "selfsigned": "^2.4.1",
    "serve-index": "^1.9.1",
    "sockjs": "^0.3.24",
    "spdy": "^4.0.2",
    "webpack-dev-middleware": "^7.4.2",
    "ws": "^8.18.0"
  }
}
중요하게 사용되는 패키지들을 정리해보면 아래와 같은 기능을 구현하기 위해 각 패키지가 사용되고 있다.
chokidar: 파일 변경 감지express: 개발서버 구현sockjs,ws: 웹소켓 통신webpack-dev-middleware: 미들웨어 구현
폴더 구조를 보면 크게 두가지로 서버와 클라이언트로 나눠져 있다.
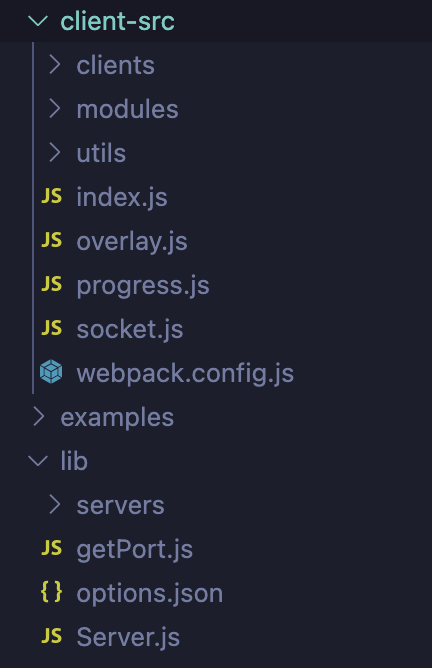
개발 서버와 웹소켓 서버
그러면 먼저 서버를 살펴보자. 서버에는 TCP, proxy 등 webpack에서 제공하는 다양한 옵션들이 제공되고 있기 때문에 최대한 HMR에 필요한 기능만 정리해서 자체적으로 만든 코드와 함께 비교하며 정리해보려한다.
HMR을 위해서 첫번째로 개발서버가 필요하다. 간단한 예제에서는 express를 이용해 http 서버를 개발서버로 구현했다.
constructor에 서버를 구현하는데 필요한 주요한 내용들이 있다.
compiler: webpack 컴파일러options: webpack-config.js에서 설정한 옵션들currentHash: 모듈 해시app: express 애플리케이션server: http 서버
  constructor(compiler: webpack.Compiler, options: any) {
    this.compiler = compiler;
    this.options = options;
    this.currentHash = undefined;

    const app = express();
    this.server = http.createServer(app);
  }
실제 코드에서는 조금 더 복잡한 로직들이 담겨있다.
// https://github.com/webpack/webpack-dev-server/blob/master/lib/Server.js#L271
const getExpress = memoize(() => require("express"));

//https://github.com/webpack/webpack-dev-server/blob/master/lib/Server.js#L1853
  async setupApp() {
    /** @type {A | undefined}*/
  this.app =
    typeof this.options.app === "function"
      ? await this.options.app()
      : getExpress()();
  }
//https://github.com/webpack/webpack-dev-server/blob/master/lib/Server.js#L2546

 async createServer() {
    const { type, options } =
      /** @type {ServerConfiguration<A, S>} */
      (this.options.server);

    if (typeof type === "function") {
      /** @type {S | undefined}*/
      this.server = await type(
        /** @type {ServerOptions} */
        (options),
        /** @type {A} */
        (this.app),
      );
    } else {
      // eslint-disable-next-line import/no-dynamic-require
      const serverType = require(/** @type {string} */ (type));

      /** @type {S | undefined}*/
      this.server =
        type === "http2"
          ? serverType.createSecureServer(
              { ...options, allowHTTP1: true },
              this.app,
            )
          : serverType.createServer(options, this.app);
    }

    this.isTlsServer =
      typeof (
        /** @type {import("tls").Server} */ (this.server).setSecureContext
      ) !== "undefined";

    /** @type {S} */
    (this.server).on(
      "connection",
      /**
       * @param {Socket} socket
       */
      (socket) => {
        // Add socket to list
        this.sockets.push(socket);

        socket.once("close", () => {
          // Remove socket from list
          this.sockets.splice(this.sockets.indexOf(socket), 1);
        });
      },
    );

    /** @type {S} */
    (this.server).on(
      "error",
      /**
       * @param {Error} error
       */
      (error) => {
        throw error;
      },
    );
  }
두번째로 웹소켓 서버를 구현하려 한다. 간단 예제에서는 ws를 이용해 웹소켓 서버를 구현했다.
  private webSocketClients: WebSocket[] = [];
  private webSocketServer: WebSocket.Server | null = null;

  constructor(compiler: webpack.Compiler, options: any) {
    // ...
    this.createWebSocketServer();
  }

 createWebSocketServer() {
    if (!this.webSocketServer) {
      this.webSocketServer = new WebSocket.Server({ server: this.server });

      this.webSocketServer.on("connection", (ws) => {
        this.webSocketClients.push(ws as WebSocket);
        //  ...
        // 클라이언트와 연결 종료 시 정리
        ws.on("close", () => {
          const index = this.webSocketClients.indexOf(ws as WebSocket);
          if (index !== -1) {
            this.webSocketClients.splice(index, 1);
          }
        });
      });
    }
  }
websocket으로 연결 후 클라이언트에게 현재 상태를 전송하고 연결 종료 시 정리하는 로직이다.
간단 예제에서는 ws로만 선택해서 구현했지만 실제 코드에서는 지원할 수 있는 websocket type에 따라 sockjs, ws를 선택해서 구현하고 있다.
// https://github.com/webpack/webpack-dev-server/blob/master/lib/Server.js#L1621
getServerTransport() {
    let implementation;
    let implementationFound = true;

    switch (
      typeof (
        /** @type {WebSocketServerConfiguration} */
        (this.options.webSocketServer).type
      )
    ) {
      case "string":
        if (
          /** @type {WebSocketServerConfiguration} */ (
            this.options.webSocketServer
          ).type === "sockjs"
        ) {
          implementation = require("./servers/SockJSServer");
        } else if (
          /** @type {WebSocketServerConfiguration} */ (
            this.options.webSocketServer
          ).type === "ws"
        ) {
          implementation = require("./servers/WebsocketServer");
        }
        // ...
      default:
        implementationFound = false;
    }

    return implementation;
  }
이제 연결된 서버에 데이터를 전송하는 로직을 추가해보자. 예제 코드에서도 동일하게 사용해도 될정도로 sendMessage 함수는 간단하다. websocket client 상태가 OPEN이면 타입, 데이터, 파라미터를 담아 JSON 형식으로 전달해주는 역할을 한다.
sendMessage(clients: WebSocket[], type: string, data?: any, params?: any) {
    for (const client of clients) {
      if (client.readyState === WebSocket.OPEN) {
        client.send(JSON.stringify({ type, data, params }));
      }
    }
  }
그러면 어떤 데이터를 넘겨주는지 살펴보자. websocket 서버 연결시 stats 데이터를 넘겨주는데 이 데이터는 컴파일러에서 제공하는 데이터로 웹팩이 번들링하는 과정에서 생성되는 메타 데이터를 담고 있는 데이터이다.
// stats 예시
{ "hash": "33a462b5ab0e8f48a065", "errors": [], "warnings": [] }
이 데이터를 통해 현재 빌드가 변경되었는지 등의 상태를 확인할 수 있고 이를 통해 변경사항을 확인할 수 있다.
예제 코드에서는 createWebSocketServer로 클라이언트를 등록하고 연결된 클라이언트에게 현재 상태를 전송하고, webpack.config.js에서 설정한 hot 옵션을 확인해 type이 hot인 sendMessage 전송한다.
const DEFAULT_STATS = {
  all: false,
  hash: true,
  warnings: true,
  errors: true,
  errorDetails: false,
};

// ...
  getStats(statsObj: Stats | MultiStats) {
    const stats = DEFAULT_STATS;
    return statsObj.toJson(stats);
  }

  sendStats(clients: WebSocket[], stats: StatsCompilation, force?: boolean): void {

   const shouldEmit =
      !force &&
      stats &&
      (!stats.errors || stats.errors.length === 0) &&
      (!stats.warnings || stats.warnings.length === 0) &&
      this.currentHash === stats.hash;

    if (shouldEmit) {
      this.sendMessage(clients, "still-ok");
      return;
    }

    // 현재 해시 저장
    this.currentHash = stats.hash;
    this.sendMessage(clients, "hash", stats.hash);

    const errors = stats.errors as NonNullable<StatsCompilation["errors"]>;
    const warnings = stats.warnings as NonNullable<
      StatsCompilation["warnings"]
    >;
    // 변경사항 전송 로직
    if (errors.length > 0 || warnings.length > 0) {
      const hasErrors = errors.length > 0;

      if (warnings.length > 0) {
        let params;

        if (hasErrors) {
          params = { preventReloading: true };
        }

        this.sendMessage(clients, "warnings", warnings, params);
      }

      if (errors.length > 0) {
        this.sendMessage(clients, "errors", errors);
      }
    } else {
      this.sendMessage(clients, "ok");
    }
  }

  createWebSocketServer() {
      this.webSocketServer = new WebSocket.Server({ server: this.server });

      this.webSocketServer.on("connection", (ws) => {
        this.webSocketClients.push(ws as WebSocket);

         if (this.options.hot === true || this.options.hot === "only") {
          this.sendMessage([ws as WebSocket], "hot");
        }

        if (!this.stats) {
          return;
        }

        // 연결된 클라이언트에게 현재 상태 전송
        this.sendStats([ws as WebSocket], this.getStats(this.stats));
      });
  }
그러면 이제 websocket 클라이언트를 연결하고 메시지를 받는 로직을 살펴보자.
dev-server 예시에서 websocket 설정이나 따로 코드를 작성하지 않았지만 자동으로 연결되었다. 그이유는 아래 코드에서 클라이언트 엔트리 파일 경로를 반환하는 addAdditionalEntries 함수를 통해 클라이언트 엔트리 파일 경로를 반환하고 이를 통해 클라이언트 엔트리 파일을 동적으로 추가해 연결하기 때문이다.
예제에서는 최대한 간략하게 만들었지만 실제는 webpack.config.js에서 설정한 옵션들을 이용해 host, port, pathname, hot 등을 추가해 연결할 수 있다.
여기서 중요한 부분은 clientHotEntry는 웹팩 자체 패키지의 dev-server 파일을 가져오고 있다는 점과 additionalEntries에 클라이언트 엔트리 파일 경로를 추가하고 있다는 점이다.
  // ...
  constructor() {
    // ...
  this.addAdditionalEntries(compiler);
  }

 private getClientEntry(): string {
    // 클라이언트 엔트리 파일 경로 반환
    return require.resolve("./client/index.js");
  }

  private getClientHotEntry(): string {
    return require.resolve("webpack/hot/dev-server.js");
  }

  //https://github.com/webpack/webpack-dev-server/blob/master/lib/Server.js#L623

  addAdditionalEntries(compiler: webpack.Compiler) {
    const additionalEntries = [];

    let webSocketURLStr = "";

    const searchParams = new URLSearchParams();

    const protocol = "ws:";

    searchParams.set("protocol", protocol);
    const port = this.options.port ?? "0";

    searchParams.set("port", String(port));

    const pathname = "";

    searchParams.set("pathname", pathname);

    searchParams.set("hot", String(this.options.hot));

    webSocketURLStr = searchParams.toString();

    additionalEntries.push(`${this.getClientEntry()}?${webSocketURLStr}`);

    const clientHotEntry = this.getClientHotEntry();
    if (clientHotEntry) {
      additionalEntries.push(clientHotEntry);
    }

    for (const additionalEntry of additionalEntries) {
      new webpack.EntryPlugin(compiler.context, additionalEntry, {
        name: undefined,
      }).apply(compiler);
    }
  }
그러면 이렇게 searchParam으로 연결한 값들은 어떻게 사용되는지 client 파일에서 살펴보자.
앞서 설정한 searchParam을 파싱한 후에 옵션을 활성화한다.
var parsedResourceQuery = parseURL(__resourceQuery)
var enabledFeatures = {
  "Hot Module Replacement": false,
  "Live Reloading": false,
  Progress: false,
  Overlay: false,
}

var options = {
  hot: false,
  liveReload: false,
  progress: false,
  overlay: false,
}

if (parsedResourceQuery.hot === "true") {
  options.hot = true
  enabledFeatures["Hot Module Replacement"] = true
}
if (parsedResourceQuery["live-reload"] === "true") {
  options.liveReload = true
  enabledFeatures["Live Reloading"] = true
}
if (parsedResourceQuery.progress === "true") {
  options.progress = true
  enabledFeatures.Progress = true
}
이렇게 켜진 옵션에 대해서는 실제 콘솔에 출력되는 로그를 통해 확인할 수 있다.

이제 서버에서 sendMessage를 통해 메시지를 전송했을 때 처리하는 로직을 보자.
sendMsg로 웹소켓 서버에서 받은 메시지를 또다시 어디론가 보내는 것을 볼 수 있다.
// https://github.com/webpack/webpack-dev-server/blob/master/client-src/utils/sendMessage.js
function sendMsg(type, data) {
  if (
    typeof self !== "undefined" &&
    (typeof WorkerGlobalScope === "undefined" ||
      !(self instanceof WorkerGlobalScope))
  ) {
    self.postMessage(
      {
        type: "webpack".concat(type),
        data: data,
      },
      "*"
    )
  }
}

var onSocketMessage = {
  hot: function hot() {
    if (parsedResourceQuery.hot === "false") {
      return
    }
    options.hot = true
  },
  invalid: function invalid() {
    log.info("App updated. Recompiling...")
    sendMessage("Invalid")
  },
  hash: function hash(_hash) {
    status.previousHash = status.currentHash
    status.currentHash = _hash
  },

  "still-ok": function stillOk() {
    sendMessage("StillOk")
  },
  ok: function ok() {
    sendMessage("Ok")
    reloadApp(options, status)
  },
  // ...
}
현재까지 우리는 개발서버, 웹소켓 서버와 클라이언트를 연결하는 과정을 알아보았다.
서버에서 클라이언트로 메시지를 보냈는데 또다시 websocket의 클라이언트는 어디론가 메시지를 보내는 것 까지 확인했다.
Webpack과 연결하기
그러면 웹소켓 클라이언트가 보낸 메시지는 어디로 어떻게 처리되는걸까? 이것을 이해하기 위해서는 앞서 개념에서 설명했던 HMR의 런타임과 컴파일러가 어떻게 동작하는지 이해해야한다.
다시 서버 코드로 돌아가 initialize 메소드 내부를 보면 setupHooks 메소드와 함께 webpack의 HotModuleReplacementPlugin을 추가하는 로직을 볼 수 있다.
setupHooks는 컴파일 결과에 따라 콜백함수를 추가하는 역할로 파일변경으로 컴파일이 새롭게 진행될 때 socket을 통해 컴파일 결과를 전달하는 역할을 담당한다.
HotModuleReplacementPlugin은 webpack 내장 플러그인으로, 컴파일 과정에서 변경된 자바스크립트 모듈 코드를 평가하고 모듈 그래프를 만들어 변경된 모듈에 따라 어디까지 적용할지 결정하는 역할을 담당한다.
  constructor(compiler: webpack.Compiler, options: any) {
    // ...
    this.setupHooks();

    new webpack.HotModuleReplacementPlugin().apply(this.compiler);

    app.use(webpackDevMiddleware(this.compiler));
  }


  setupHooks(): void {
    this.compiler.hooks.invalid.tap("webpack-dev-server", () => {
      if (this.webSocketServer) {
        this.sendMessage(this.webSocketClients, "invalid");
      }
    });
    this.compiler.hooks.done.tap(
      "webpack-dev-server",

      (stats) => {
        if (this.webSocketServer) {
          this.sendStats(this.webSocketClients, this.getStats(stats));
        }
        this.stats = stats;
      }
    );
  }
실제 코드는 아래와 같다.
// https://github.com/webpack/webpack-dev-server/blob/master/lib/Server.js#L1744
async initialize() {
    // ...
    if (this.options.webSocketServer) {
      const compilers =
        /** @type {MultiCompiler} */
        (this.compiler).compilers || [this.compiler];

      for (const compiler of compilers) {
        if (compiler.options.devServer === false) {
          // eslint-disable-next-line no-continue
          continue;
        }

        this.addAdditionalEntries(compiler);

        if (this.options.hot) {
          const HMRPluginExists = compiler.options.plugins.find(
            (p) => p && p.constructor === webpack.HotModuleReplacementPlugin,
          );

          if (HMRPluginExists) {
            this.logger.warn(
              `"hot: true" automatically applies HMR plugin, you don't have to add it manually to your webpack configuration.`,
            );
          } else {
            // Apply the HMR plugin
            const plugin = new webpack.HotModuleReplacementPlugin();

            plugin.apply(compiler);
          }
        }
      }
    }


// https://github.com/webpack/webpack-dev-server/blob/master/lib/Server.js#L1883
setupHooks() {
    this.compiler.hooks.invalid.tap("webpack-dev-server", () => {
      if (this.webSocketServer) {
        this.sendMessage(this.webSocketServer.clients, "invalid");
      }
    });
    this.compiler.hooks.done.tap(
      "webpack-dev-server",
      /**
       * @param {Stats | MultiStats} stats
       */
      (stats) => {
        if (this.webSocketServer) {
          this.sendStats(this.webSocketServer.clients, this.getStats(stats));
        }

        /**
         * @private
         * @type {Stats | MultiStats}
         */
        this.stats = stats;
      },
    );
  }
그러면 HotModuleReplacementPlugin 플러그인이 어떻게 동작하는지 살펴보자.
생각보다 코드가 복잡하고, 실제로 CommonJS, ESM 등 다양한 자바스크립트 환경을 지원하도록 구현되어 있기 때문에 기본적인 module.hot만 지원하는 부분만 간단히 살펴보려 한다.
파일 변경으로 변경된 모듈을 변경한다는 것은 생각보다 복잡한 일이다. 먼저 변경된 파일이 영향을 미치는 모듈들을 찾아야하고, 변경된 모듈에 따라 어디까지 적용할지 결정해야한다.
상당히 복잡하지만 코드를 살펴보면 chunk, module에 대해 해시 계산을 하고 이전 빌드의 해시 값과 비교하여 다른 경우 변경된 모듈로 마킹하고 변경 사항이 있으면 hotIndex 증가시킨다.
compiler.hooks.compilation.tap(
  PLUGIN_NAME,
  (compilation, { normalModuleFactory }) => {
    // This applies the HMR plugin only to the targeted compiler
    // It should not affect child compilations
    if (compilation.compiler !== compiler) return

    // #region module.hot.* API
    compilation.dependencyFactories.set(
      ModuleHotAcceptDependency,
      normalModuleFactory
    )
    compilation.dependencyTemplates.set(
      ModuleHotAcceptDependency,
      new ModuleHotAcceptDependency.Template()
    )

    let hotIndex = 0
    /** @type {Record<string, string>} */
    const fullHashChunkModuleHashes = {}
    /** @type {Record<string, string>} */
    const chunkModuleHashes = {}

    compilation.hooks.record.tap(PLUGIN_NAME, (compilation, records) => {
      if (records.hash === compilation.hash) return
      const chunkGraph = compilation.chunkGraph
      records.hash = compilation.hash
      records.hotIndex = hotIndex
      records.fullHashChunkModuleHashes = fullHashChunkModuleHashes
      records.chunkModuleHashes = chunkModuleHashes
      records.chunkHashes = {}
      records.chunkRuntime = {}
      for (const chunk of compilation.chunks) {
        const chunkId = /** @type {ChunkId} */ (chunk.id)
        records.chunkHashes[chunkId] = chunk.hash
        records.chunkRuntime[chunkId] = getRuntimeKey(chunk.runtime)
      }
      records.chunkModuleIds = {}
      for (const chunk of compilation.chunks) {
        records.chunkModuleIds[/** @type {ChunkId} */ (chunk.id)] = Array.from(
          chunkGraph.getOrderedChunkModulesIterable(
            chunk,
            compareModulesById(chunkGraph)
          ),
          m => chunkGraph.getModuleId(m)
        )
      }
    })
    /** @type {TupleSet<[Module, Chunk]>} */
    const updatedModules = new TupleSet()
    /** @type {TupleSet<[Module, Chunk]>} */
    const fullHashModules = new TupleSet()
    /** @type {TupleSet<[Module, RuntimeSpec]>} */
    const nonCodeGeneratedModules = new TupleSet()
    compilation.hooks.fullHash.tap(PLUGIN_NAME, hash => {
      const chunkGraph = compilation.chunkGraph
      const records = /** @type {Records} */ (compilation.records)
      for (const chunk of compilation.chunks) {
        /**
         * @param {Module} module module
         * @returns {string} module hash
         */
        const getModuleHash = module => {
          if (compilation.codeGenerationResults.has(module, chunk.runtime)) {
            return compilation.codeGenerationResults.getHash(
              module,
              chunk.runtime
            )
          }
          nonCodeGeneratedModules.add(module, chunk.runtime)
          return chunkGraph.getModuleHash(module, chunk.runtime)
        }
        const fullHashModulesInThisChunk =
          chunkGraph.getChunkFullHashModulesSet(chunk)
        if (fullHashModulesInThisChunk !== undefined) {
          for (const module of fullHashModulesInThisChunk) {
            fullHashModules.add(module, chunk)
          }
        }
        const modules = chunkGraph.getChunkModulesIterable(chunk)
        if (modules !== undefined) {
          if (records.chunkModuleHashes) {
            if (fullHashModulesInThisChunk !== undefined) {
              for (const module of modules) {
                const key = `${chunk.id}|${module.identifier()}`
                const hash = getModuleHash(module)
                if (
                  fullHashModulesInThisChunk.has(
                    /** @type {RuntimeModule} */ (module)
                  )
                ) {
                  if (records.fullHashChunkModuleHashes[key] !== hash) {
                    updatedModules.add(module, chunk)
                  }
                  fullHashChunkModuleHashes[key] = hash
                } else {
                  if (records.chunkModuleHashes[key] !== hash) {
                    updatedModules.add(module, chunk)
                  }
                  chunkModuleHashes[key] = hash
                }
              }
            } else {
              for (const module of modules) {
                const key = `${chunk.id}|${module.identifier()}`
                const hash = getModuleHash(module)
                if (records.chunkModuleHashes[key] !== hash) {
                  updatedModules.add(module, chunk)
                }
                chunkModuleHashes[key] = hash
              }
            }
          } else if (fullHashModulesInThisChunk !== undefined) {
            for (const module of modules) {
              const key = `${chunk.id}|${module.identifier()}`
              const hash = getModuleHash(module)
              if (
                fullHashModulesInThisChunk.has(
                  /** @type {RuntimeModule} */ (module)
                )
              ) {
                fullHashChunkModuleHashes[key] = hash
              } else {
                chunkModuleHashes[key] = hash
              }
            }
          } else {
            for (const module of modules) {
              const key = `${chunk.id}|${module.identifier()}`
              const hash = getModuleHash(module)
              chunkModuleHashes[key] = hash
            }
          }
        }
      }

      hotIndex = records.hotIndex || 0
      if (updatedModules.size > 0) hotIndex++

      hash.update(`${hotIndex}`)
    })
  }
)
변경된 모듈을 파악했으면 해당 모듈을 교체해야 한다. 그러기 위해서 해당 모듈에 대한 정보를 Manifest.json와 HotupdateChunk를 만든다.
if ((newModules && newModules.length > 0) || (newRuntimeModules && newRuntimeModules.length > 0)) {
  const hotUpdateChunk = new HotUpdateChunk();
  hotUpdateChunk.id = chunkId;
  // 모듈 및 런타임 모듈 연결
  chunkGraph.attachModules(hotUpdateChunk, newModules || []);
  chunkGraph.attachRuntimeModules(hotUpdateChunk, newRuntimeModules || []);

  const renderManifest = compilation.getRenderManifest({ ... })
  for (const entry of renderManifest) {
    compilation.emitAsset(filename, source, {
      hotModuleReplacement: true,
      ...assetInfo
    })
  }
}

for (const [
  filename,
  { removedChunkIds, removedModules, updatedChunkIds, assetInfo },
] of hotUpdateMainContentByFilename) {
  const hotUpdateMainJson = {
		c: Array.from(updatedChunkIds),
		r: Array.from(removedChunkIds),
		m:
			removedModules.size === 0
				? completelyRemovedModulesArray
				: completelyRemovedModulesArray.concat(
						Array.from(removedModules, m => chunkGraph.getModuleId(m))
				)
    }

  const source = new RawSource(JSON.stringify(hotUpdateMainJson))
    compilation.emitAsset(filename, source, {
      hotModuleReplacement: true,
      ...assetInfo,
    })
  }
}
이렇게 만든 Manifest.json과 HotupdateChunk를 클라이언트에게 전달하고 클라이언트는 이를 받아 변경된 모듈을 교체한다.
compilation.hooks.additionalTreeRuntimeRequirements.tap(
  PLUGIN_NAME,
  (chunk, runtimeRequirements) => {
    runtimeRequirements.add(RuntimeGlobals.hmrDownloadManifest)
    runtimeRequirements.add(RuntimeGlobals.hmrDownloadUpdateHandlers)
    // ...
    compilation.addRuntimeModule(chunk, new HotModuleReplacementRuntimeModule())
  }
)
실제로 예제에서 파일변경시 네트워크 탭을 보면 아래와 같이 chunk와 manifest가 네트워크 요청으로 전달되는 것을 확인할 수 있다.
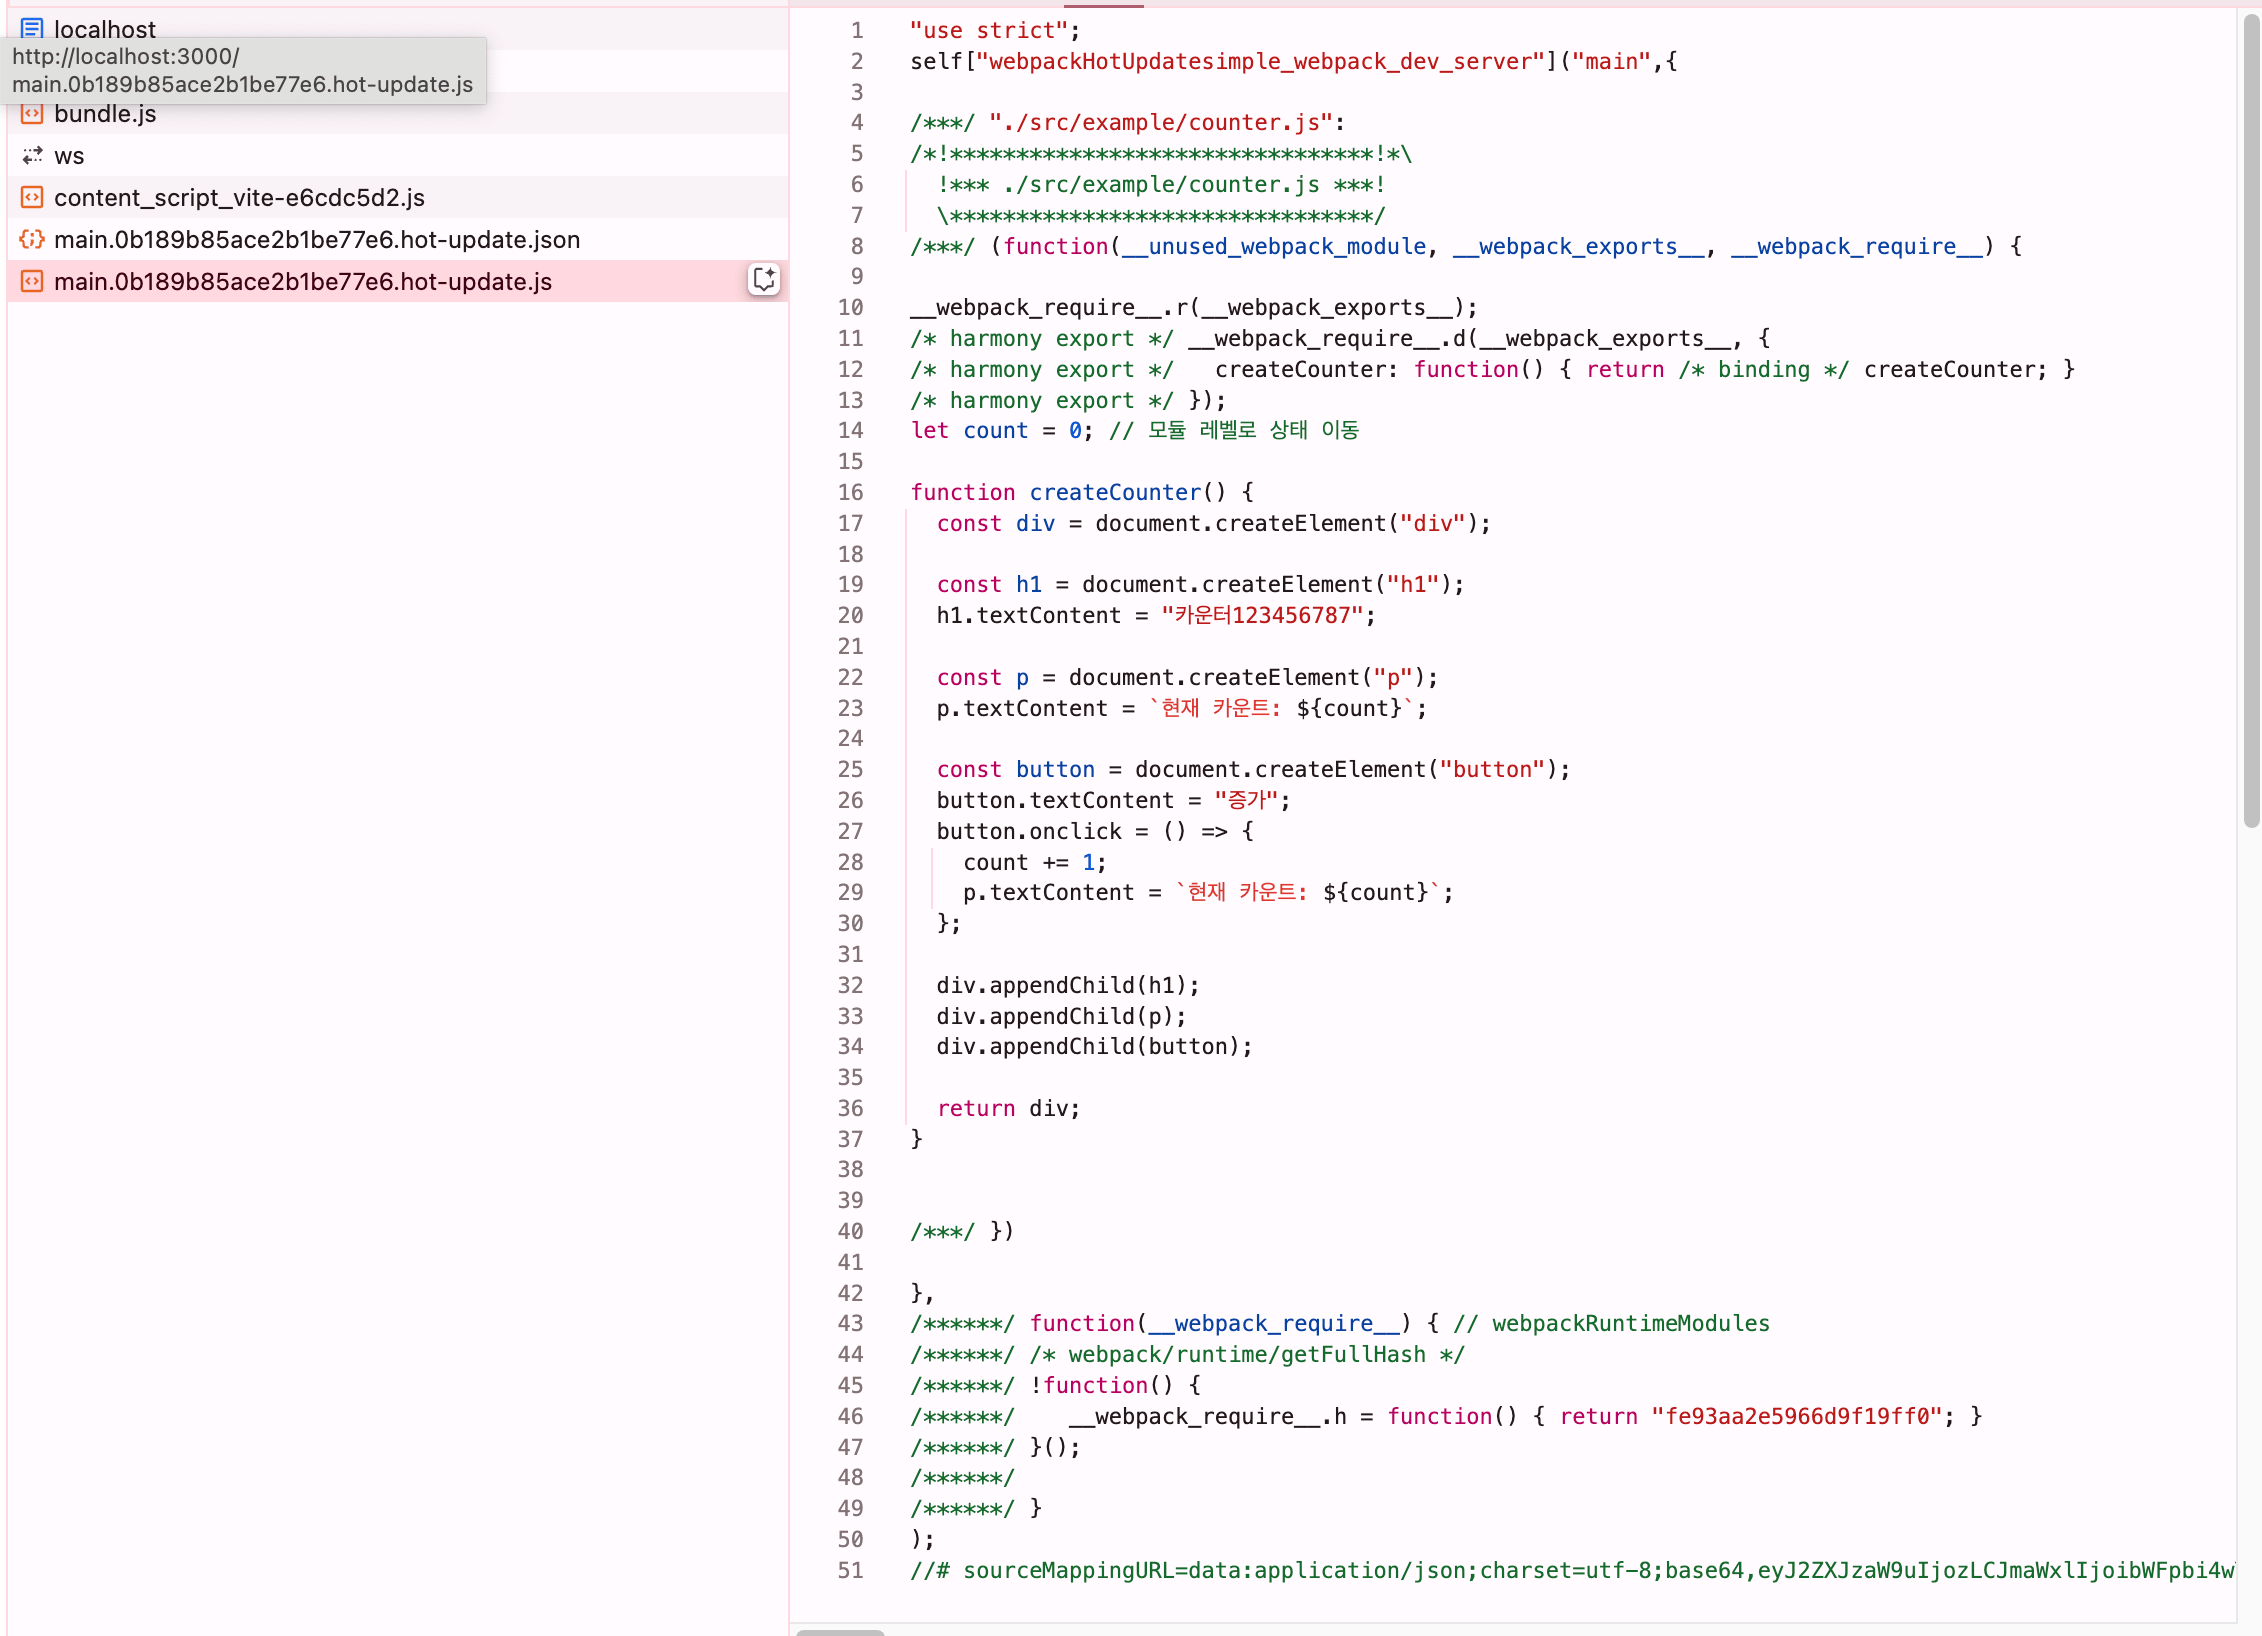
그리고 hot-update.js을 자세히 보면 다음과 같은 코드가 담겨있다.
"use strict"
self["webpackHotUpdatesimple_webpack_dev_server"]("main", {
  /***/ "./src/example/counter.js":
    /*!********************************!*\
  !*** ./src/example/counter.js ***!
  \********************************/
    /***/ function (
      __unused_webpack_module,
      __webpack_exports__,
      __webpack_require__
    ) {
      // ...바뀐 모듈 내용
    },
})
앞서 websocket 클라이언트의 sendMsg함수에서 보내는 형식과 동일하다는 것을 볼 수 있다.
// sendMsg.js
self["webpackHotUpdatesimple_webpack_dev_server"]("main", {
// ...
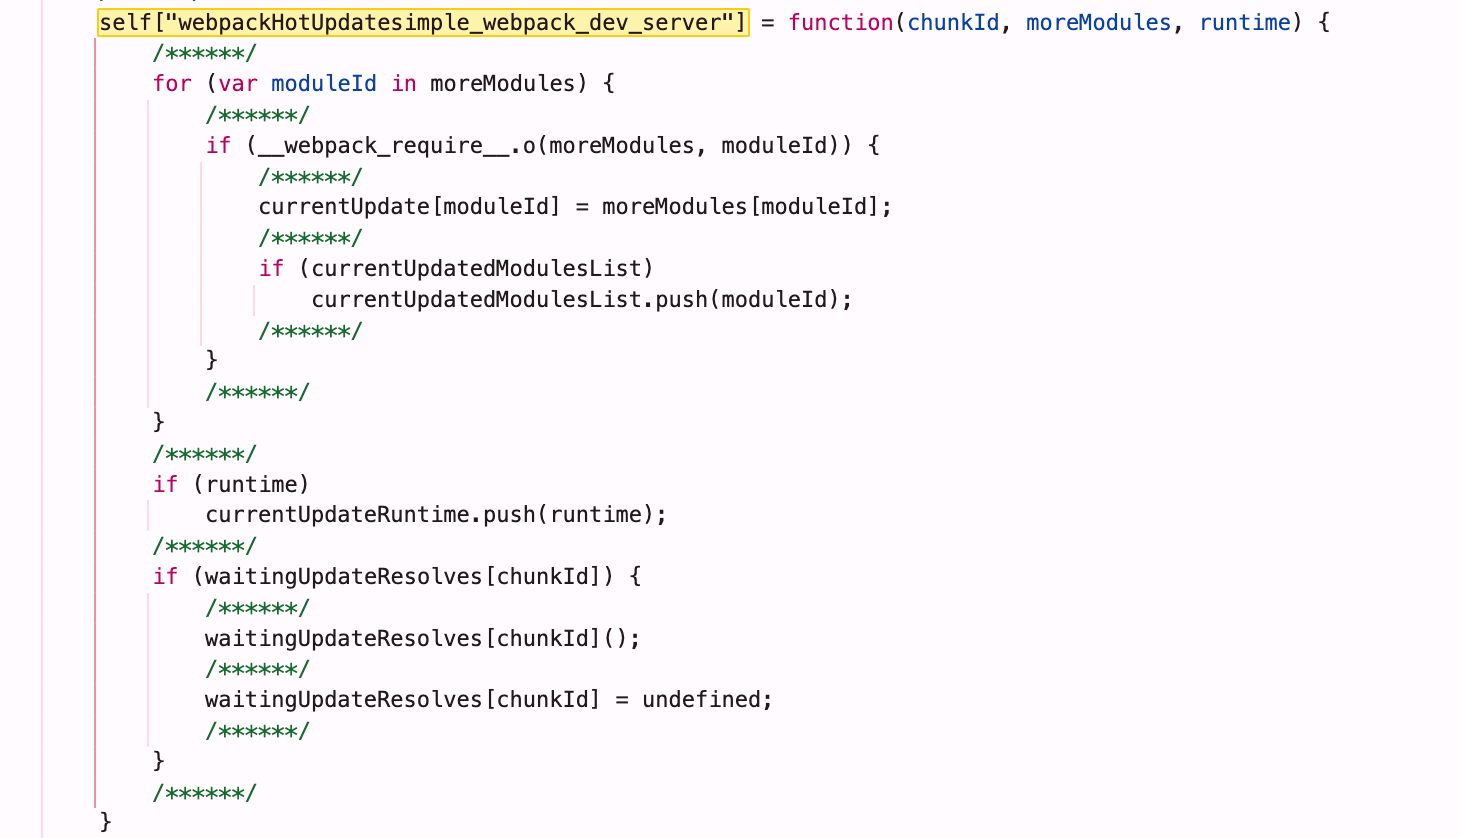
})정리해보면 webpack으로 컴파일하는 과정에서 런타임에서 모듈 변경시 실행할 이벤트 리스너를 콜백으로 전달하게 되고, 파일별로 설정할 수 있게 제공하는 API를 module.hot으로 볼 수 있다. 그리고 websocket 서버에서 파일변경으로 변경된 모듈 정보를 넘기면 websocket 클라이언트에서는 해당 정보를 받아 교체하고, 런타임에 등록된 이벤트 리스너를 실행해 미리 정의한 로직을 실행할 수 있게 된다.
아래는 변경된 파일이 아니라 초기 번들에 담긴 런타임 코드이다.
파일 변경 이벤트 전달
이제 마지막으로 간단한 파일 변경 이벤트 처리 부분이다. 처음에는 chokidar를 사용하여 파일 변경을 감지하고, websocket 이벤트로 전달할 줄 알았지만 webpack-dev-middleware에서 처리되고 있었다.
chokidar은 static file을 감지할 때 사용되고 있다.
watchFiles(watchPath, watchOptions) {
const chokidar = require("chokidar");
const watcher = chokidar.watch(watchPath, watchOptions);
// disabling refreshing on changing the content
if (this.options.liveReload) {
watcher.on("change", (item) => {
if (this.webSocketServer) {
this.sendMessage(
this.webSocketServer.clients,
"static-changed",
item,
);
}
});
}
this.staticWatchers.push(watcher);
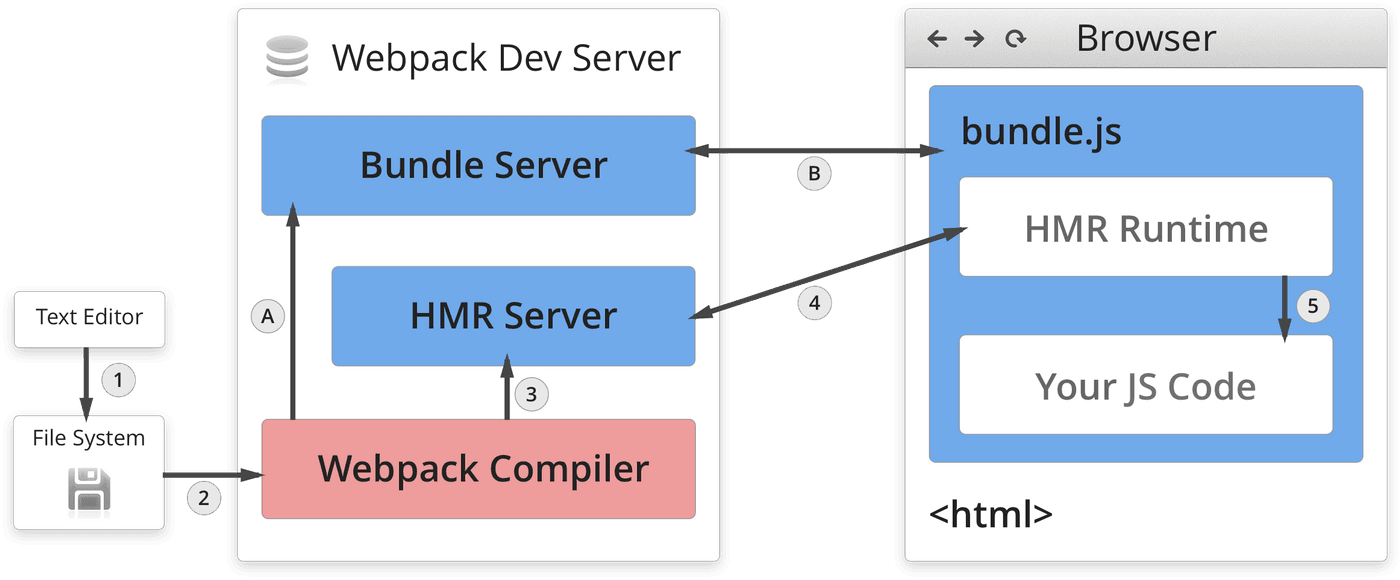
}정리
정리해보면 아래와 같이 그림으로 나타낼 수 있다.
예시로 작성했던 코드는 여기에 올려두었다.
평소 당연하게 생각하는 기능 안에 얼마나 많은 고민이 담겨있는지 느낄 수 있었다. 원래는 Fast Refresh까지 보려했지만 이미 너무 방대한 내용이 담겨있는 것 같아 webpack에서의 HMR 동작방식만 먼저 알아보았다.
다음에는 Next.js에서의 HMR 동작방식을 알아보고, 마지막으로 Fast Refresh 동작방식을 알아보려 한다.